Chrome Extension
The POD Master Chrome Extension gives your print team a fast browser popup to browse orders, preview customer designs, print order summaries, and manage fulfillment — all connected directly to your POD Master account.
Overview
The POD Master Print Connector extension runs in Chrome or any Chromium-based browser (Edge, Brave, etc.). Once connected with your staff credentials it gives you:
Browse Orders
Paginated order list with search, date filters, and fulfillment status filter.
View Designs
Preview customer design thumbnails for each product side in every order.
Print Summaries
Print formatted order summaries using your browser's print dialog.
Mark Fulfilled
Update fulfillment status directly from the order detail view.
The extension connects as a staff account. Staff accounts are created and Chrome login access is granted in Settings → User Access & Staff inside the POD Master Shopify app.
Prerequisites
- Google Chrome, Microsoft Edge, or another Chromium-based browser
- A staff account with Chrome login enabled (configured by the store owner)
- Your Shop ID — the subdomain of your Shopify store (e.g.,
mystorefrommystore.myshopify.com) - Your staff account email address and password
Installing the Extension
The POD Master Print Connector is available on the Chrome Web Store. You can install it directly in Chrome or any Chromium-based browser (Edge, Brave, etc.) with just a few clicks — no manual file management or Developer mode required.
Step 1 — Install from the Chrome Web Store
Open the extension page
Click the link above or visit the POD Master Print Connector page on the Chrome Web Store.
Add to Chrome
Click the Add to Chrome (or Get) button and confirm the installation when prompted.
Pin the extension
Click the extensions icon (puzzle piece) in your browser toolbar, find POD Master Print Connector, and click the pin icon to keep it easily accessible.
Step 2 — Open the Extension
Click the POD Master Print Connector icon in your toolbar. On first install, the settings page opens automatically so you can connect your staff account.
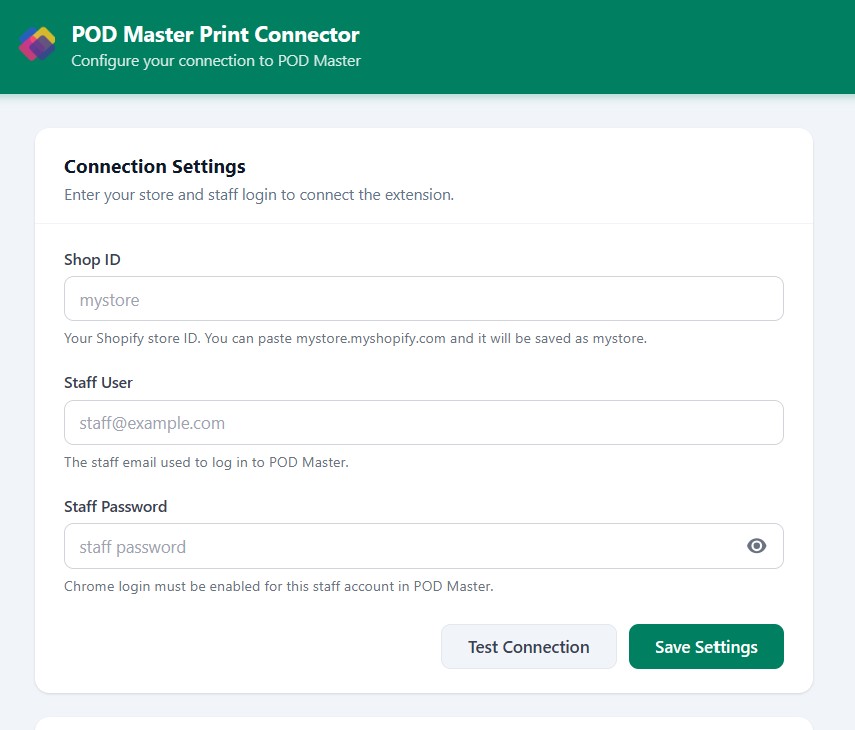
Connection Setup
On first install the settings page opens automatically. You can also reach it by clicking the extension icon → gear icon, or right-clicking the extension → Options.
Enter Your Credentials
The settings form has three fields:
| Field | What to enter |
|---|---|
| Shop ID | Your Shopify store subdomain — the part before .myshopify.com. For example, if your store is mystore.myshopify.com, enter mystore. The extension automatically strips the full domain if you paste it. |
| Staff Email | The email address of your staff account in POD Master (not your Shopify admin login). |
| Password | The password for your POD Master staff account. |
There is no App URL or API Key field. The extension connects directly to the POD Master server — no additional configuration is needed.
Save & Connect
Click Save Settings to save your credentials and verify the connection in one step. The extension will attempt to reach the server and confirm your credentials are valid. A green banner will appear showing your connected shop and the number of available orders.
You can also click Test Connection at any time to re-verify without saving.
Using the Extension
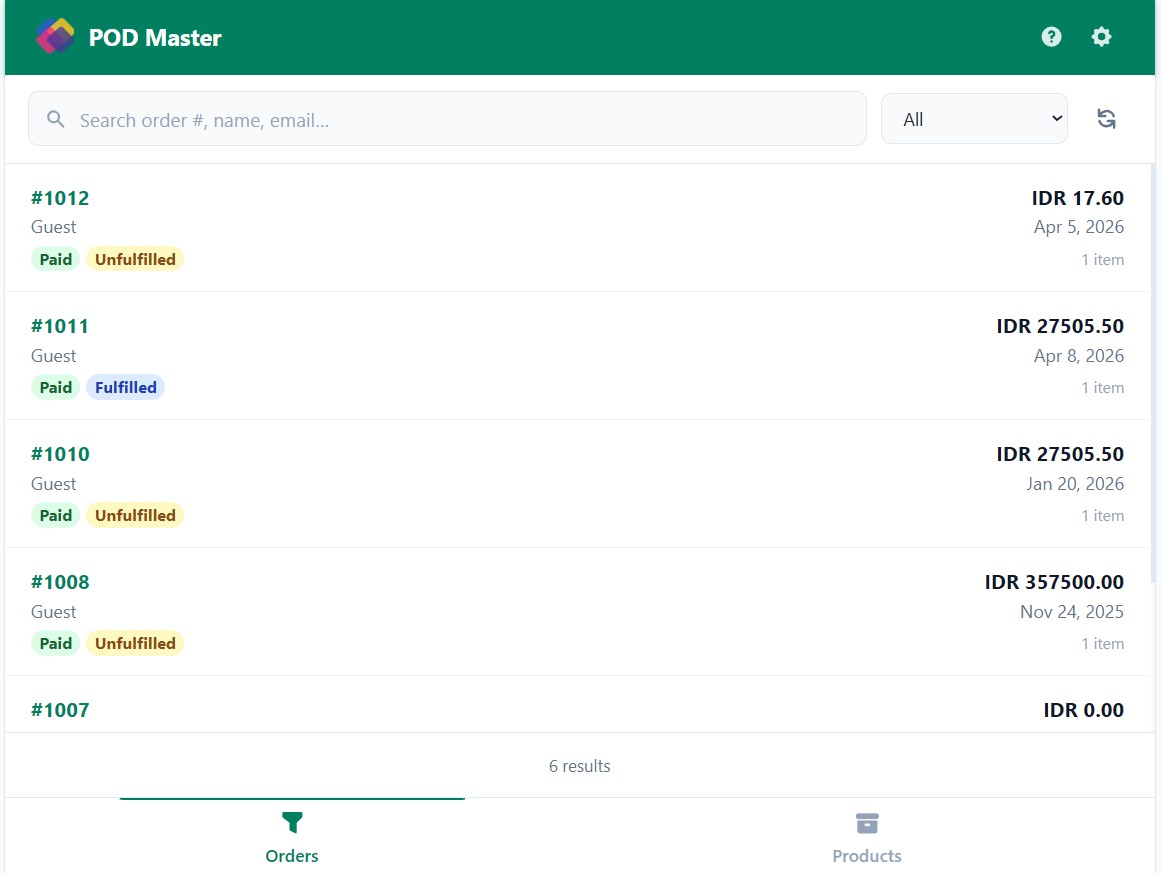
Orders Tab
Click the extension icon to open the popup, then select the Orders tab. Each order card shows the order number, customer name, date, payment status, fulfillment status, and item count.
- Use the search bar to filter by order number, customer name, or email.
- Use the status filter to show only unfulfilled, fulfilled, or all orders.
- Use Prev / Next to page through results.
Order Detail
Click any order card to open its full detail view:
- Order information — order number, date, financial and fulfillment status, total
- Customer — name, email, phone
- Shipping — shipping method and cost
- Line items — product name, variant, SKU, quantity, price, and design thumbnails for each side
- PDF files — print-ready PDFs linked to each design, with print profile details
Printing
From the order detail view, use the Print button in the Order Information header to open a formatted order summary in a new tab. The browser print dialog opens automatically.
All printing uses the browser's built-in print dialog (window.print()). You choose the printer, paper size, and other settings directly in the dialog.
Marking Orders Fulfilled
Use the Mark Fulfilled button in the Order Information header to update the fulfillment status of an order. Once marked, the button changes to Fulfilled and is disabled to prevent duplicate updates.
Products Tab
Switch to the Products tab to browse your store's customizable products. Click any product to see its details including variants, design templates, and print profile assignments.
Print Profiles
Print profiles are configured in the POD Master app under Settings → Print Profiles. They define how designs are formatted for printing — paper size, orientation, margins, design placement, and color mode.
Creating a Print Profile
- Go to Settings → Print Profiles in the POD Master Shopify app
- Click Add Print Profile
- Fill in the profile details and save
| Field | Description |
|---|---|
| Profile Name * | A descriptive name, e.g., "A4 Portrait – Mug Prints" |
| Set as Default | Makes this the default profile for new orders |
| Print Width / Height | Paper dimensions in centimeters (e.g., 21.0 × 29.7 for A4) |
| Orientation | Portrait or Landscape |
| Margins | Top, right, bottom, left margins in centimeters |
| Design Width * | Width of the design area in centimeters |
| Design Position * | Where to place the design on the page (9 positions) |
| Color Model | RGB or CMYK — see below |
| Print Device | Your printer name for reference |
Fields marked * are required.
Color Model: RGB vs CMYK
- RGB — Best for digital printing: T-shirts, canvas prints, wall art, pillow cases, rugs, doormats
- CMYK — Best for commercial offset printing: business cards, brochures, packaging, stickers
When CMYK is selected, choose an ICC Profile that matches your printing process:
| ICC Profile | Best For |
|---|---|
| USWebCoatedSWOP | US commercial offset printing |
| PSO Coated v3 – Glossy | European offset with glossy laminate |
| PSO Coated v3 – Matte | European offset with matte laminate |
| PSO Uncoated v3 (FOGRA52) | Uncoated paper printing |
| JR G7 | G7-certified proofing and printing |
| Metal Printing (FOGRA60) | Metal and specialty substrate printing |
Troubleshooting
"Extension not configured" message
- Click the gear icon in the popup header to open settings
- Enter your Shop ID, staff email, and password, then click Save Settings
Connection failed
- Double-check your Shop ID — enter only the subdomain part (e.g.,
mystore, notmystore.myshopify.com) - Confirm the email and password match a valid staff account in POD Master
- Ask the store owner to verify that Chrome login is enabled for your staff account in Settings → User Access & Staff
- Ensure the staff account status is Active (not pending or suspended)
Orders not loading after connecting
- Use Test Connection in the settings page to verify your credentials are still valid
- If you recently changed your password, update it in the extension settings and save again
Print dialog not opening
- Allow pop-ups for the extension in your browser settings
- If the print preview tab opens but the dialog does not appear automatically, click the Print button in that tab manually